
Word Tables
You might want to use native MS Word tables in your DM Word report for:
- Table of Contents
- Index to Financial Statements
- Signatures
- Exhibit Index
- Text alignment where tabs or a tabbed list was previously used, such as on the cover page

- Text in multiple columns, for example, two-column bulleted lists
- Images, call out boxes, or other stylization
Most of the tables in your report should be set up as Table CrossLinks (see Linking). Do not update the structure or content of linked tables in Word; make all updates in Excel, and then Update CrossLinks.
Insert a Word Table
- Turn on Show Formatting Marks and View Gridlines (see DM Word Tips)
- Place your cursor where you want the table. Press Enter on your keyboard to create more space, if needed. Don't let the table touch other tables. Leave at least one hard return in between to prevent the tables from merging
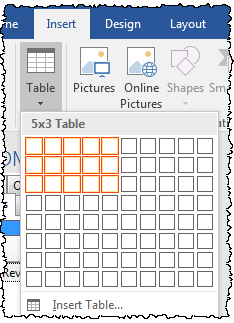
- On the Insert ribbon, click Table and then select the table dimensions. Include empty columns for spacing so that the table will fill the page width
- Drag and drop, or cut and paste, the information into the table
-
Delete extra spaces, tabs, and hard returns that are not needed
Format the Table
- On the Table Tools: Layout ribbon, click Cell Margins. Set the default cell margins for Left and Right to 0"

- Adjust the column widths to fit the text, so that the table is as wide as the page in Word. Then set it to AutoFit Window
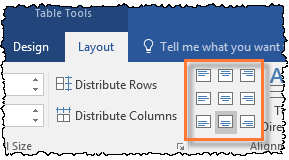
- On the Table Tools: Layout ribbon, use the alignment buttons to adjust each cell
- Set the row height. Use the specify height setting to Adjust Row Height, or add paragraph spacing on the text. Don't use blank rows on a table that will be banded. To make a hard return inside a table show in HTML, add a non-breaking space in front of it.
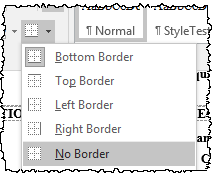
- Adjust the table borders, or remove them. Select the table, then on the Home ribbon, click the Borders drop down > No Borders
- Set up and apply Table Banding
- Apply Keep With Next if appropriate to keep the table from breaking across pages
- Preview HTML and adjust the formatting as needed
Add or Delete Rows or Columns
To insert rows or columns, click the Table Tools > Layout ribbon and then Insert Above, Insert Below, Insert Left, or Insert right, depending on your cursor position.
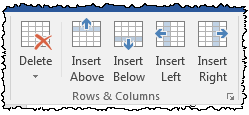
To delete rows or columns, place your cursor in the row or column (or select multiple). On the Table Tools > Layout ribbon, click Delete, then Delete Row or Delete Column.
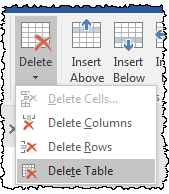
Delete a Table
To delete a Word table in your report, click inside the table. On the Table Tools > Layout ribbon, click Delete, then Delete Table.
Using Delete Table with a table CrossLink removes the table, breaks the link, and drops (orphans) XBRLExtensible Business Reporting Language (XBRL) is an XML-based standard for defining and exchanging business and financial performance information. tags.
Copyright © 2021 Certent